
2000 Elite S Build - "Mr. Grey"
Moderator: Moderator
Re: Dio hill climber
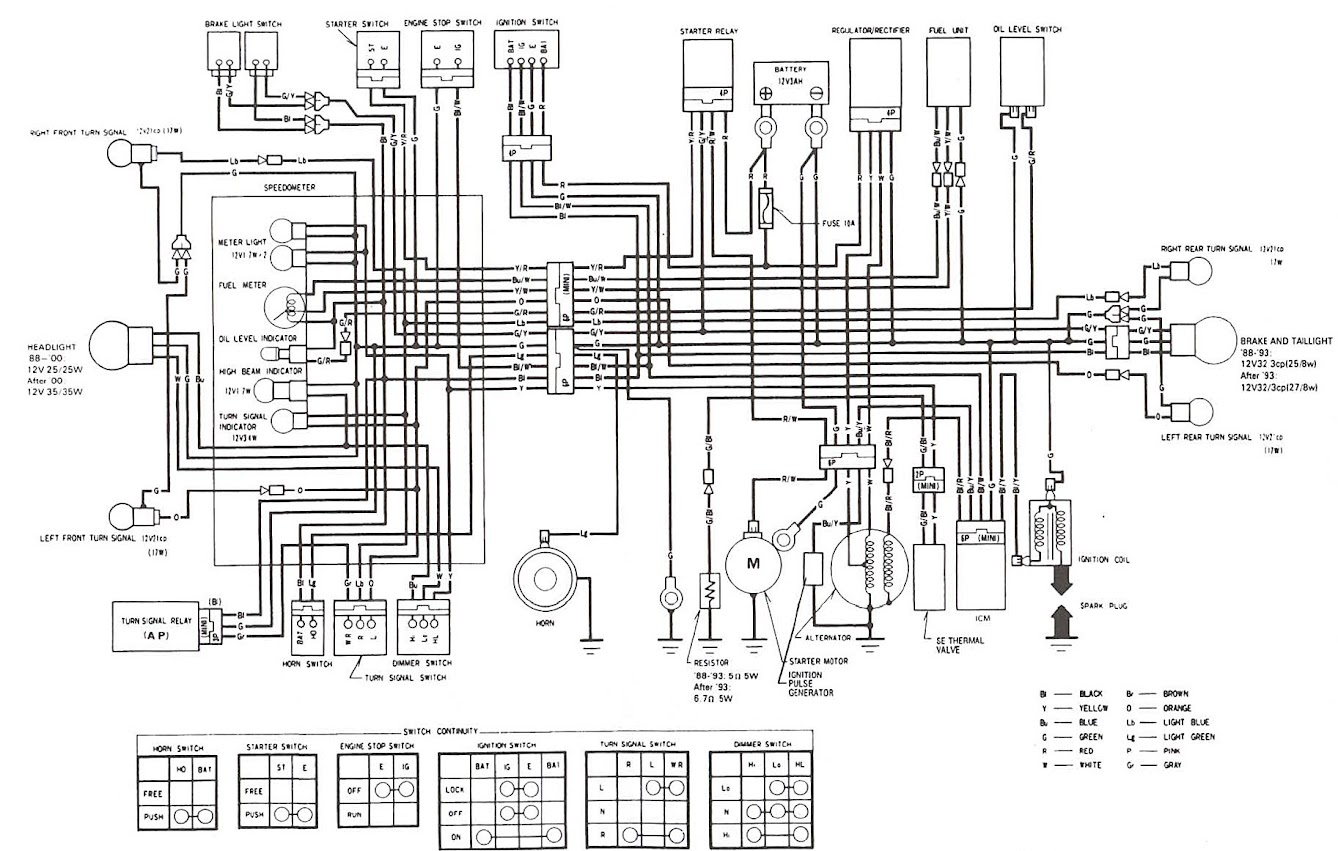
Just for posterity, here's a better pic of the SA50 electrical schematic. I enlarged and increased contrast so it's easier to read printed. Might as well share since I have it:
Re: Dio hill climber
Alarm Remote Start: so the alarm does provide 12v on the auxiliary Batt line when remote start is activated, however it also appears to need the ignition line to show an open (normally grounded). I think an open is the correct starting state anyway. Without that opened, the engine will turn over but not start because the ICM thinks there's no correct key position, or can also be interpreted as the engine stop switch set to off. So to get remote start working, I believe you need to have the alarm provide 12v on the ignition batt line (which it does), and a relay signal to throw (which it does) a triple pole triple throw relay to do the following (which the alarm does not provide):
1) Jump the brake switch line providing continuity (simulates press brake lever).
2) Jump the starter switch line providing continuity (simulates press start switch).
3) Break the 'IG' line to the open state (simulate turning key).
I could be wrong on the 'IG' state but it does need to be something to tell the ICM to start. You also need to have the engine stop switch in the run state depending on where you intercept the 'IG' line. Or you could make the relay a quad pole/throw and jump over that.
Anyway, long story short, I'm not going to install the remote start and run all those jumps. If I'm wrong in my accessment please someone correct me and make this installation easier
-
Wheelman-111
- Moderator

- Posts: 11319
- Joined: Wed Oct 22, 2008 5:09 pm
- Location: Deepinnaharta, Texas
Re: Dio hill climber
Greetings:
Beware of aftermarket alarm systems hard-wired into the circuitry. A friend of mine had such a system. When their electronics go bad, FAR more likely than Honda's wiring given their country of manufacture, it may leave you stranded. Anyway her car wouldn't start because of a failure of the alarm system. Remote start? Do you really want your scooter idling, unattended, outside?
Beware of aftermarket alarm systems hard-wired into the circuitry. A friend of mine had such a system. When their electronics go bad, FAR more likely than Honda's wiring given their country of manufacture, it may leave you stranded. Anyway her car wouldn't start because of a failure of the alarm system. Remote start? Do you really want your scooter idling, unattended, outside?
Wheelman-111
Most of my money is spent on scooterparts. The rest is just wasted.
"ISO": '03 Vespa ET4 Malossi187 74MPH
Flash 9: 2001 Elite SR Contesta 72 ZX Tran, 9:1 Gears, Stock Airbox/Carb/Pipe 58.8 MPH
Punkin: 2010 Vespa/Malossi S78, 61MPH
Most of my money is spent on scooterparts. The rest is just wasted.
"ISO": '03 Vespa ET4 Malossi187 74MPH
Flash 9: 2001 Elite SR Contesta 72 ZX Tran, 9:1 Gears, Stock Airbox/Carb/Pipe 58.8 MPH
Punkin: 2010 Vespa/Malossi S78, 61MPH
Re: Dio hill climber
I was only thinking about putting in remote start because the feature was included with the system. What I really wanted is two-way paging to let you know the if it's going off. Range is limited of course. Right now the worse the alarm can do is drain the battery. Hard wiring only on the turn lights, aux batt line, +12v batt, GND.
I've had 3 bikes stolen from me over the years and want all the deterrents I can get a hold off. Granted my current location is low crime. Concern noted though.
I've had 3 bikes stolen from me over the years and want all the deterrents I can get a hold off. Granted my current location is low crime. Concern noted though.
Re: Dio hill climber
I put in a #96 main and it felt a little lazy. Looks like the right range for me is 90-96. I'll leave the #96 in for a bit through breakin and read temps/plugs.
The 8.4:1 from Graphite are set to arrive tomorrow. In the meantime I pulled the old gears. Man that trans case was a tough nut. Something to be said about the value of bike that has already been worked on. One of the dowel pins had rusted pretty good and was holding on to that case like I was stealing his mama. I couldn't pull the dowel out without mangling it to death so some sandpaper and high temp anti-seize got put to use. The case gasket had no chance of surviving. I'm waiting on receiving the gears for a fit check before ordering the gasket in case I also need that extra #11 thrust washer to account for an oversized counter shaft (thanks to the collective knowledge of the forum).
The isolated driveshaft spins smoothly without grit but it does feel like there's a little drag. Is it supposed to spin pretty freely with out force or is some drag from the oil seals normal?
-
Trafficjamz

- CBR1000RR

- Posts: 5353
- Joined: Tue Jul 14, 2009 7:53 pm
- Location: Eastlake, MI
- Contact:
Re: Dio hill climber
pressing gears is pretty easy.
Here are some pics of my first time doing it.
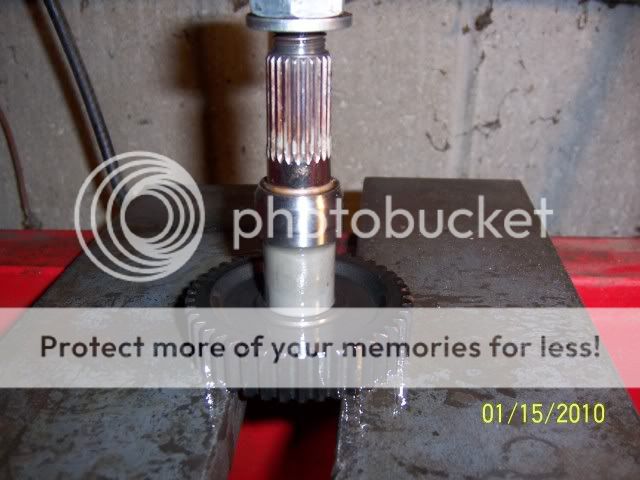
sprayed it with WD 40 and put it in the press.

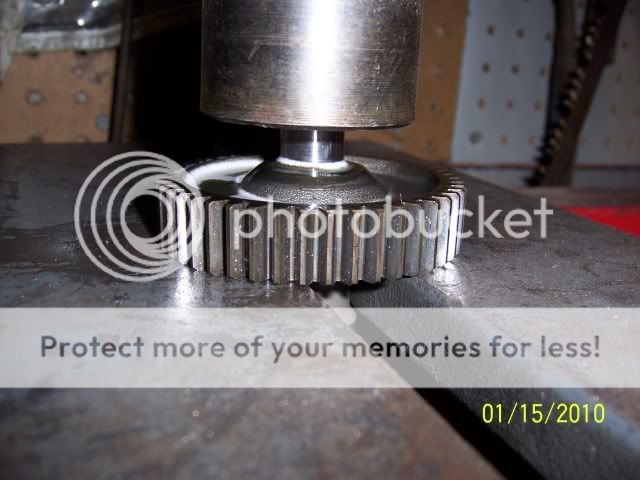

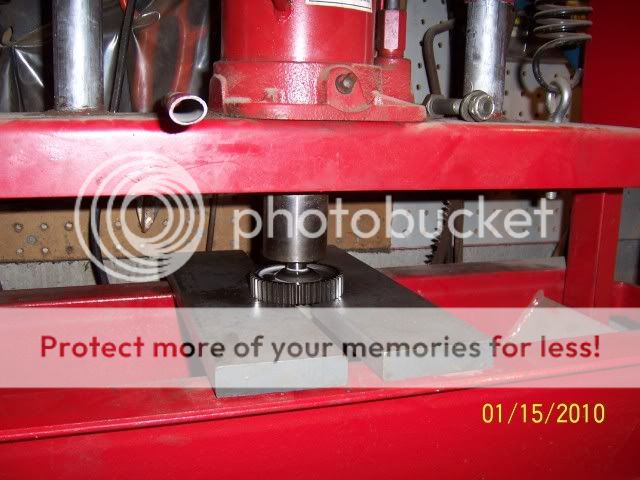
What a stubborn piece of S**t ! Time to put some heat to it. Torch? Oh no no no...that's not my style.
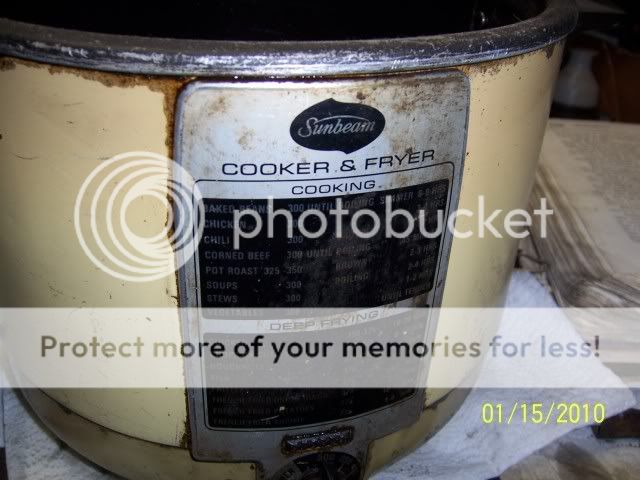
Go to the kitchen, get the fry daddy , get some castrol 10w 40, Set it for abou 350-375 or "pot roast" if your cooker has this setting Soak your stubborn gear and shaft for about 10min. Return to the press and try again.


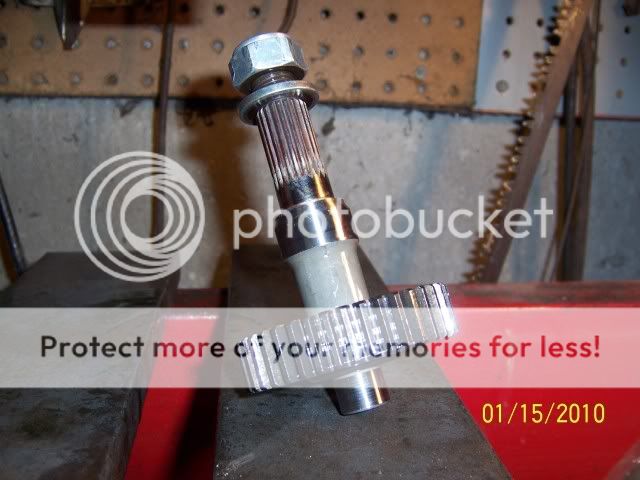
Bam! like butta baby! And just like that It came out. And no torches to OVER HEAT the gear
Now make sure you wash your fryer out really good before you make jalapeno poppers, at you next party.

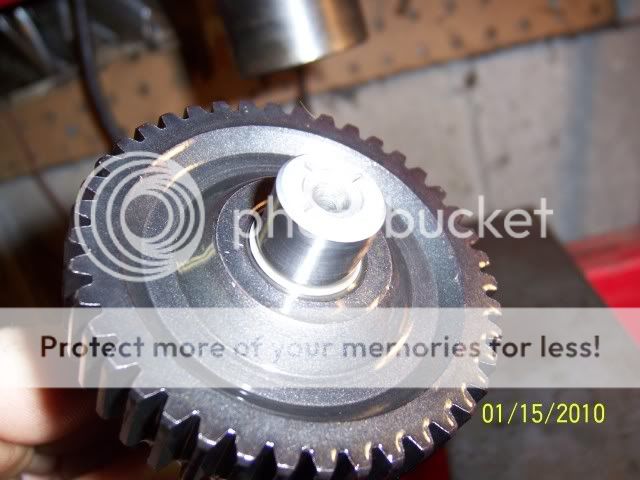
I gave the new gear the fry daddy treament before I even tried to press it on the shaft. It worked very good.
The new gear went on with no trouble.

Here are some pics of my first time doing it.
sprayed it with WD 40 and put it in the press.
What a stubborn piece of S**t ! Time to put some heat to it. Torch? Oh no no no...that's not my style.
Go to the kitchen, get the fry daddy , get some castrol 10w 40, Set it for abou 350-375 or "pot roast" if your cooker has this setting
Bam! like butta baby! And just like that It came out. And no torches to OVER HEAT the gear
Now make sure you wash your fryer out really good before you make jalapeno poppers, at you next party.
I gave the new gear the fry daddy treament before I even tried to press it on the shaft. It worked very good.
The new gear went on with no trouble.
new best 1/8th mile time 9.647 seconds @67.155 mph 310lbs total weight
Re: Dio hill climber
Much obliged for the share TJ. Putting on the nut to protect the treads and provide a more stable press surface is a good idea I hadn't thought of. I think I'll give it the WD-40 or deep fry treatment now.
Re: Dio hill climber
Received the 8.44:1 gears today - thanks Graphite for fast shipping. Did a fit check of the countershaft and indeed, I need the nylon to thinner metal washer replacement. These are the Kawata brand for Dio 17T x 41T.


So I wanted to understand what exactly the needed difference was and measured the countershaft gear stack:
OEM = 29.7mm
Kawata = 29.94mm
For a difference of 0.24mm. Without a gasket, with normal OEM setup there is very slight cover teeter-totter on the gears. With a gasket looks like it's a super tight tolerance fit. I can imagine if you over-cranked the cover down it would be possible to create binding. The Kawata gear stack with normal washer setup creates a pretty large teeter-totter on cover I see no way for the gasket to fill. It seems like a small difference, but it'll be the difference between a sealing trans cover and one that leaks and binds gears. So, a thinner washer stack is needed.
OEM:

Kawata:

For the washer's thickness:
Nylon in back = 1.42mm
Metal in front = 0.96mm
Combined they're 2.38mm. To match the gear stack difference, we'd need a washer stack of no more than 2.14mm. If you substitute another metal washer for the nylon washer, the combined thickness is 1.92mm. Another bonus is that little extra space gives you some peace of mind that you can't unintentionally bind the gears by over-cranking on cover bolts.
On another note, good idea to stock the Naraku jet kit, Graphite. I think they're a great value to guys trying to dial in their stock setups.
So I wanted to understand what exactly the needed difference was and measured the countershaft gear stack:
OEM = 29.7mm
Kawata = 29.94mm
For a difference of 0.24mm. Without a gasket, with normal OEM setup there is very slight cover teeter-totter on the gears. With a gasket looks like it's a super tight tolerance fit. I can imagine if you over-cranked the cover down it would be possible to create binding. The Kawata gear stack with normal washer setup creates a pretty large teeter-totter on cover I see no way for the gasket to fill. It seems like a small difference, but it'll be the difference between a sealing trans cover and one that leaks and binds gears. So, a thinner washer stack is needed.
OEM:
Kawata:
For the washer's thickness:
Nylon in back = 1.42mm
Metal in front = 0.96mm
Combined they're 2.38mm. To match the gear stack difference, we'd need a washer stack of no more than 2.14mm. If you substitute another metal washer for the nylon washer, the combined thickness is 1.92mm. Another bonus is that little extra space gives you some peace of mind that you can't unintentionally bind the gears by over-cranking on cover bolts.
On another note, good idea to stock the Naraku jet kit, Graphite. I think they're a great value to guys trying to dial in their stock setups.
Re: Dio hill climber
I pulled the motor to figure out what the heck was going wrong with the side stand installation. The problem was the bolt head was hitting part of the hanger:
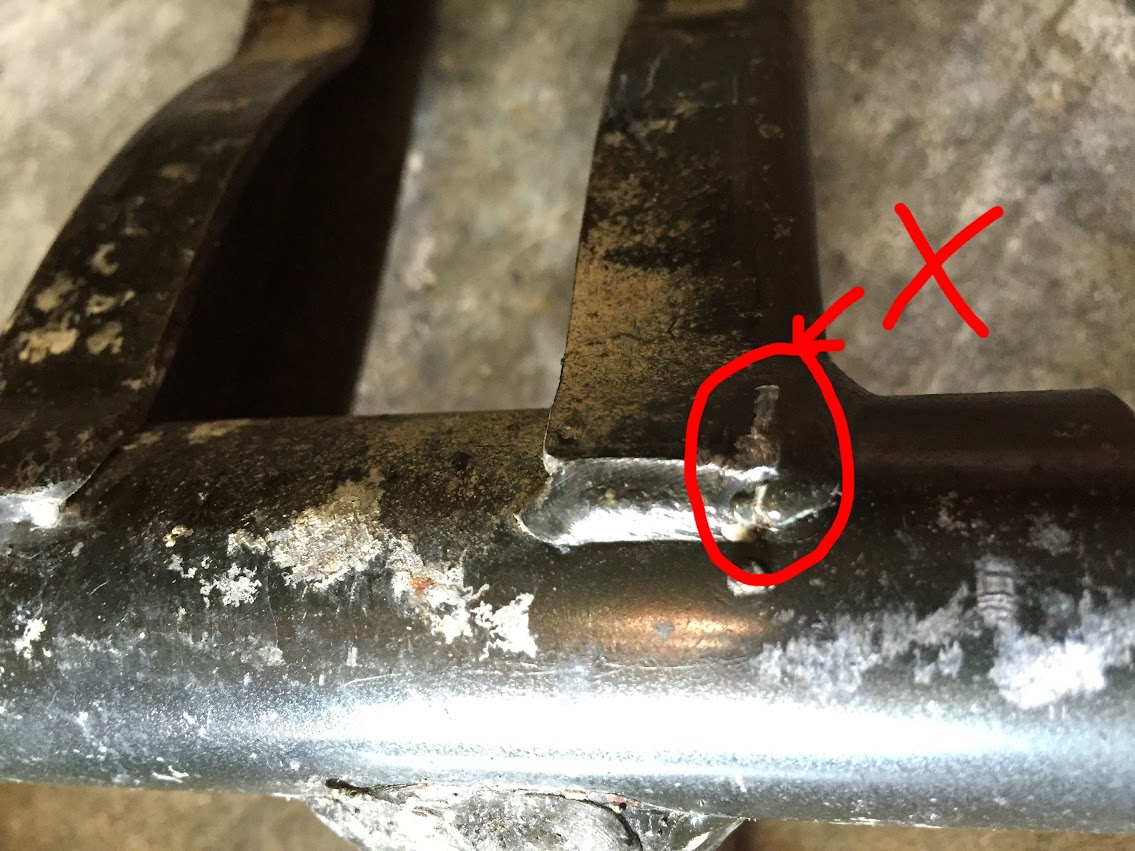
As it turns out, you have to drill your holes in the middle or near the outer edge of the stand range:

By doing that you move the head just outside the edge of that welded part. Incorrect location:
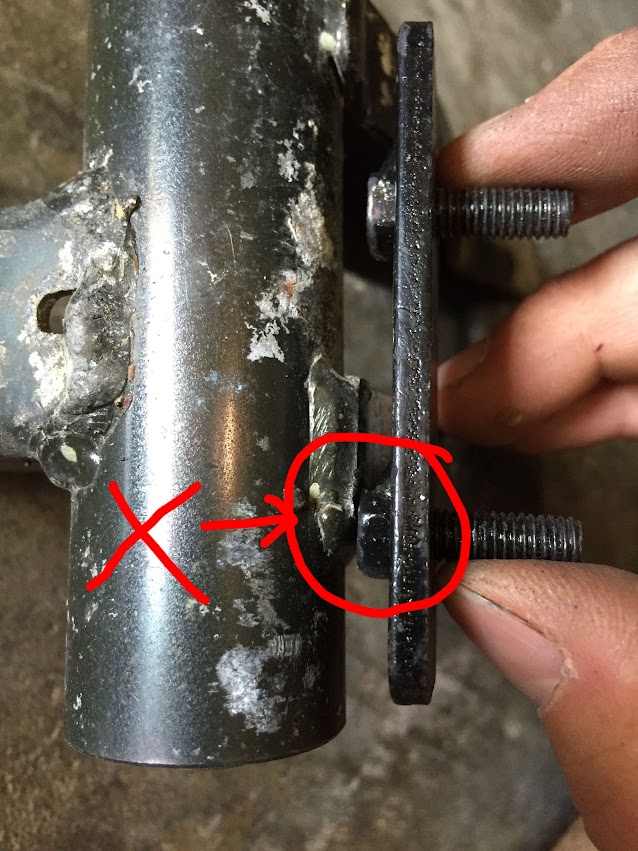
Correct location:
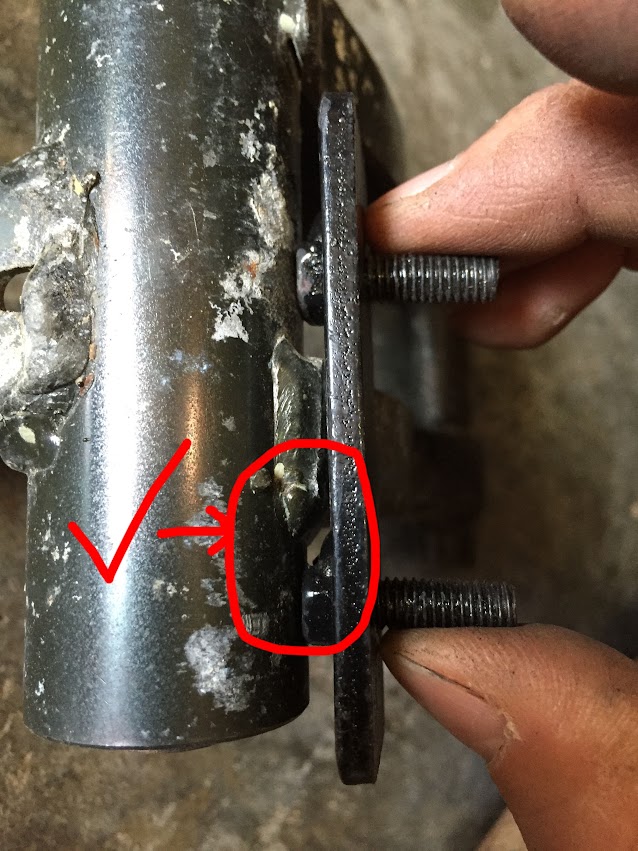
So, selecting where in that range is important. From the top looking down, that means the bolts/plate piece should be moved to the edge of the frame:

After I did that, the engine hanger doesn't catch anymore and everything is right with the world. I will add, pulling the motor and drilling from the top down was a heck of a lot easier than jacking up the bike, moving the hanger out of the way, and drilling upside down.
As it turns out, you have to drill your holes in the middle or near the outer edge of the stand range:
By doing that you move the head just outside the edge of that welded part. Incorrect location:
Correct location:
So, selecting where in that range is important. From the top looking down, that means the bolts/plate piece should be moved to the edge of the frame:
After I did that, the engine hanger doesn't catch anymore and everything is right with the world. I will add, pulling the motor and drilling from the top down was a heck of a lot easier than jacking up the bike, moving the hanger out of the way, and drilling upside down.
Re: 2000 Elite S Build - "Mr. Grey"
We all know running our scooters gives much better miles per gallon than cars. I started thinking about what that cost difference actually comes out to. Some assumptions:
1) Car does 17 MPG.
2) Scooter does 60 MPG.
3) 1 gallon of gas is $3.50.
4) Scooter mixes 32:1 of oil, which is 4 oz. per gallon.
5) Premium 2 stroke oil is $15-$20 for 1 litter, so let's say $16/liter which comes out to about $1.90 per 4 ounces (or per gallon for mixing).
Using those numbers, a car does $0.21/mile, and the scooter does $0.09/mile. A little better than half that of a car. That result actually really surprised me as I never really thought about the running cost of oil. Granted there are many other pros and cons comparing the two (such as maintenance cost), but ignoring those, there wasn't as much cost advantage as it appears on the surface. At least for me. Sure $16/liter for oil is a bit pricy, but I'm using what's easily available to all on Amazon. If I used the scooter as a daily driver I'd probably buy the 5 gallon versions at half the cost, but that still puts it at $0.07/mile. A third of a car. Better, but not mind blowing the way 60 MPG sounds.
Just brain dumping..
Re: 2000 Elite S Build - "Mr. Grey"
I think the biggest cost savings is yearly car insurance vs. one time bicycle license fee.
Re: 2000 Elite S Build - "Mr. Grey"
That's true for some states. In CA you need:
- motorcycle license
- registration
- insurance
Just like a car. Granted they're cheaper than the car equivalent. I miss Hawaii.
- motorcycle license
- registration
- insurance
Just like a car. Granted they're cheaper than the car equivalent. I miss Hawaii.
Re: 2000 Elite S Build - "Mr. Grey"
This site with the past posts history and current people have helped me a great deal. Giving back to (hopefully) help someone else is just the right thing to do. If everyone helped someone when they were helped, this planet would be an amazing and more friendly place. Share'n da aloha spirit, as some would say.
For me, seeing pics makes things very clear very easily. It does take a bit more time to post them, but if it aids in explaining then I'm all for that.
For me, seeing pics makes things very clear very easily. It does take a bit more time to post them, but if it aids in explaining then I'm all for that.
Re: 2000 Elite S Build - "Mr. Grey"
Transmission tuning time:
- Malossi 72cc Cast Iron, BR8HS
- Stock pipe/carb, #96 main, needle richened
- Polini for Dio Vari
- 8.44:1 gears
- Polini Blue contra (+15%)
- Koso 1k RPM clutch springs
For giggles started with 5.9g x 6 (35.4g). Way too light. Top speed around 45 mph. Went the heaviest I got with OEM 9g x 6 (54g) and still seems light. Short RPM lag off the line then she's spinning fast for the rest. Top speed around 54 mph. Going to swap in the Polini White Contra (+7%) with 9g rollers and see how she does. I know, I know, get a tach. My butt-tach works ok most of the time and I save on batteries.
Temps were interesting. I felt #96 main was slightly rich so figured I'd be pretty cool on WOT runs.. Not quite. After warmed up and running, WOT for 20 secs on flats starts driving it up to 370F. Maxed at 374F then I backed off. My guess is it's because the bore's not fully broken in yet, and possibly slightly because it's high revving with the light roller / stiff contra arrangement. Is that temp normal for break-in? Any other ideas? Someone say check for airleaks.
-
1man8scoots
- CB900F
- Posts: 1485
- Joined: Wed Mar 18, 2015 11:49 am
- Location: usa
Re: 2000 Elite S Build - "Mr. Grey"
Of course check for leaks ha.
I'll sell you a tach for 10$ shipped. Wrap the wire around the spark plug wire and bam tach fun. Excessive rpm on the cast kit is kind of pointless. 9k and it's seriously done. It likes 8k a lot. And helps keep the temps down.
96 jet is pretty fat but how does the plug look?
I'll sell you a tach for 10$ shipped. Wrap the wire around the spark plug wire and bam tach fun. Excessive rpm on the cast kit is kind of pointless. 9k and it's seriously done. It likes 8k a lot. And helps keep the temps down.
96 jet is pretty fat but how does the plug look?