bfowler wrote:Well following pats wonderful advise, went back in there and added in the cats tongue finish on the intake. Fairly pleased with how my first attempt at using a dremel went. Just glad nothing went horribly wrong haha.
Now the next step is to get this stuck bearing out of the case. Been trying to pry it out using a socket but I'm afraid its going to break my wrench. Also need to get the seal out on the other side.
Looking good that makes all the difference worth the work B-) nice job
paulpauly7 wrote:did you remember that little triangle piece i told you about
Yes I did, thanks for telling me about that pauly.
Well today was a pretty uneventful day as far as the build goes. Loaded the crank with bearing on and the gears into my backpack and skateboarded around San Fran to about 10 different auto shops hoping one of them could remove the bearing from the crank as well as press the new gears on. Sadly not one shop could do it. Only one shop could press the gears on but the guy told me I should just find a shop that can do both. Hopefully tomorrow I can catch the bus to another machine shop that I think can get the job done. Will post back with results.
graphite9 wrote:You won't find anyone to press the bearings off the crank.
If I won't find anyone to do it, then how am I supposed to get it done? There must be a shop that can do it, it would take 5 minutes. And one shop can do it but the guy Saudi should try to find a shop that can do both the gears and the crank bearing. I believe auto zone has a bearing separator in their loan a tool program so I'm gonna check that out tomorrow and then hopefully go back to the shop and get the gears pressed on.
Yea, harbor freight sells one if those. But I'm really not trying to buy more and more tools. This is my only scooter and I don't think ill be splitting the case again anytime soon. I checked auto zones lone a tool program and it looks like theirs has the bearing separator that I need. Seems like they have a big one and a small one so I'm hoping the small one will work. Will post back with results if I can get down there today!
Haha it'll stay one scoot for a while. I'm a broke college student going to school in San Francisco. No cash to buy more scooters, definitely not enough cash to pay rent the garage for my apartment haha. Maybe if I was home in Hawaii I could keep them in my garage but then again scooters are an arm and a leg in Hawaii. And get stolen on the daily.
Went down to autozone. Their bearing splitter in the rent a tool program was just a TINY but too big. Kinda bummed about that. Went down to about 6 different mechanic shops. Most of them couldn't press the new gears on and remove the bearing and the ones that could wanted to charge me $65 for it. Outrageous price. Hopefully I can find somewhere that'll press the 8.44 gears on for a lot cheaper...
Still havent been able to get the gears pressed and the bearing removed from the crank shaft. Seems like I'm going to have to pay $65 to get it done. Honda metropolitan scooter part out just got posted on CL. Should I try to see if I can pick up the rims? Is it worth buying or will it not add very much to my build (performance wise)?
Hey guys! Sorry for not updating in a month. Been really busy with midterms and the girlfriend so I haven't had time to work on this. I couldn't find anywhere that could remove the bearing from the crank for a reasonable price so I ordered the bearing separator from harbor freight and got the bearing off the crank with ease. Today I did some boost port matching using the base gasket as a guide. Not perfect but I'm pretty happy with it. There's pictures below. I made little teeny tiny marks on the surface where the base gasket goes due to some slips when using the dremel but I'm pretty sure they won't cause a leak (i hope ). With that said, should I use some hondabond on top of the case and then place the base gasket on top? Or will those little tiny scuffs be okay?
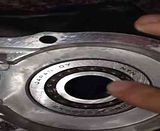
Threw the bearings in the freezer for 2 days and put the case in the oven at 350 for 12 minutes. The bearings definitely didn't slide in easily like I've read on many other posts. I'm assuming its because it's the first time bearings are being replaced so it's sort of like a virgin case? Anyways, I had to hammer in the bearings. I put the old bearings on top of the new bearings and hammered them in. I hope I didn't damage them What are the symptoms of a spun bearing. I notice one bearing is SLIGHTLY harder to spin and I can sort of hear it as it spins. There's a video below and if you listen closely you can kind of hear it. Just want to make sure the bearings are okay. Went ahead and ordered the tusk crank puller so that should arrive in a couple of days and then this bad boy will be up and running hopefully!
graphite9 wrote:Did you hammer on the race or the inner area. If you did it with a socket the diameter of the outer race your OK. If you hammered the entire bearing I'd be nervous. New bearings will always feel tighter than old ones.
I put the old bearing over the new one and hammered it in
for the price of a bearing
if I had any doubt in my head I would replace it
just think of it this way for about $15.
you could save a whole lot of time and maybe other parts
by replacing it now instead of later
Paul
bfowler wrote:
graphite9 wrote:Did you hammer on the race or the inner area. If you did it with a socket the diameter of the outer race your OK. If you hammered the entire bearing I'd be nervous. New bearings will always feel tighter than old ones.
I put the old bearing over the new one and hammered it in